如何让 React Native 项目支持 WEB 网页端
前言
不同于expo-cli脚手架创建的项目,以前使用react-native脚手架创建的 React Native 项目并不能直接运行在网页端。幸运的是,社区中已经有大佬提供了解决方案react-native-web,他实现了一套支持网页端的react-native组件。我们可以通过打包工具将react-native库的引用替换为react-native-web然后再解决一些小问题,就可以将我们的项目打包到网页端运行了。
安装依赖
npm i react-dom react-native-web
或yarn add react-dom react-native-web。
再安装webpack打包工具和一些插件:
npm i -D webpack webpack-cli webpack-dev-server babel-loader babel-plugin-react-native-web file-loader react-native-web-image-loader mini-css-extract-plugin css-minimizer-webpack-plugin clean-webpack-plugin html-webpack-plugin
同样的,你可以使用yarn。
依赖简要说明
webpack、webpack-cli是打包工具所需依赖,webpack-dev-server是启动开发环境(在一个端口上运行网页应用)所需依赖。
babel-loader是为了解析JavaScript不同 ECMAScript 语法和语法糖,让浏览器可以识别并运行的关键。
babel-plugin-react-native-web是react-native-web的一个插件,可以自动设置别名,把react-native的引用换为react-native-web。
file-loader是为了让webpack解析项目中引入的除.js外的一些文件,比如图片.jpg音频.mp3视频.mp4等等。
react-native-web-image-loader是为了让webpack解析react-native中使用的@2x@3x的图片资源,并且能解决项目代码中使用Image组件图片没有设置宽高属性导致运行在网页端后图片不显示的问题。这个加载器很好的将项目中用到的图片解析成一个对象:
AdaptiveImage {
    "data": {
        "uri": "static/media/pic1.abcd1234.png",
        "uri@2x": "static/media/pic1@2x.4321dcba.png",
        "uri@3x": "static/media/pic1-3x.efgh5678.png",
        "width": 128,
        "height": 64
    },
    get uri(),       // returns uri based on pixel ratio
    get width(),     // returns this.data.width
    get height(),    // returns this.data.height
}
项目运行在网页端时,会根据window.devicePixelRatio的值拿到不同@2x@3x的图片。
mini-css-extract-plugincss-minimizer-webpack-plugin是用来解析.css文件的,并压缩优化样式。
clean-webpack-plugin插件会在每次运行webpack打包前删除之前打包产生的文件。
html-webpack-plugin是为了生成网页的index.html供应用访问。
添加 Webpack 配置
创建一个web文件夹,和iosandroid文件夹平级,这样方便进行项目管理。
在web文件夹下创建webpack.config.js文件,进行webpack配置。
const path = require('path')
const { CleanWebpackPlugin } = require('clean-webpack-plugin');
const MiniCssExtractPlugin = require('mini-css-extract-plugin');
const HtmlWebpackPlugin = require('html-webpack-plugin');
const resolvePath = (relativePath) => path.resolve(__dirname, relativePath);
module.exports = {
mode: 'development',
entry: resolvePath('../index.js'),
output: {
filename: '[name].[contenthash:8].js',
path: resolvePath('build'),
publicPath: '/',
},
devtool: 'cheap-module-source-map',
plugins: [
new CleanWebpackPlugin(),
new HtmlWebpackPlugin({
inject: 'body',
template: resolvePath('index.html'),
}),
new MiniCssExtractPlugin({
filename: '[name].[contenthash:8].css',
}),
],
module: {
rules: [
{
test: /\.js$/,
use: {
loader: 'babel-loader',
options: {
cacheDirectory: true,
presets: ['module:metro-react-native-babel-preset'],
plugins: ['react-native-web'],
configFile: false,
},
},
},
{
test: /\.(mp3|mp4)$/,
use: {
loader: 'file-loader',
options: {
name: '[name].[ext]',
outputPath: 'sounds',
esModule: false,
},
},
},
{
test: /\.(png|jpe?g|gif)$/,
options: {
name: '[name].[hash:8].[ext]',
outputPath: 'images',
scalings: { '@2x': 2, '@3x': 3 },
esModule: false,
},
loader: 'react-native-web-image-loader',
},
{
test: /\.css$/,
use: [MiniCssExtractPlugin.loader, 'css-loader'],
},
],
},
resolve: {
alias: {
'react-native{{ content }}#x27;: 'react-native-web'
},
extensions: ['.web.js', '.js'],
},
};
添加 index.html
在web文件夹下添加index.html网页端访问时的入口文件:
<!DOCTYPE html>
<html lang="en">
    <head>
        <meta charset="UTF-8">
        <meta http-equiv="X-UA-Compatible" content="IE=edge">
        <meta name="viewport" content="width=device-width, initial-scale=1.0">
        <title>Document</title>
    </head>
    <body>
        <noscript>You need to enable JavaScript to run this app.</noscript>
        <div id="root"></div>
    </body>
</html>
添加快捷脚本
在package.json的scripts中添加start:web,方便之后启动网页端项目开发。
{
  "scripts": {
    "这只是注释": "在存在的其他项后面添加下面的内容",
    "start:web": "webpack serve --config web/webpack.config.js"
  }
}
然后就可以通过npm run start:web或者yarn start:web命令启动网页端开发环境了。
运行网页端应用
在项目根目录index.js入口文件调用运行应用的方法AppRegistry.runApplication:
import {AppRegistry} from 'react-native';
import App from './App';
import {name as appName} from './app.json';

AppRegistry.registerComponent(appName, () => App);
AppRegistry.runApplication(appName, { rootTag: document.getElementById('root') });
如果项目index.js配置了很多原生端才有的东西,可以新建一个index.web.js文件针对网页端进行特殊处理。
然后使用npm run start:web或yarn start:web启动应用。
调试

如果你的项目安装了很多三方组件库,可能存在一些依赖库是只适用于原生平台,调用了NativeModule原生模块,并不适用于网页端,那么我们可以先使用一个空壳组件代替它。
先确定是哪一个依赖库报错
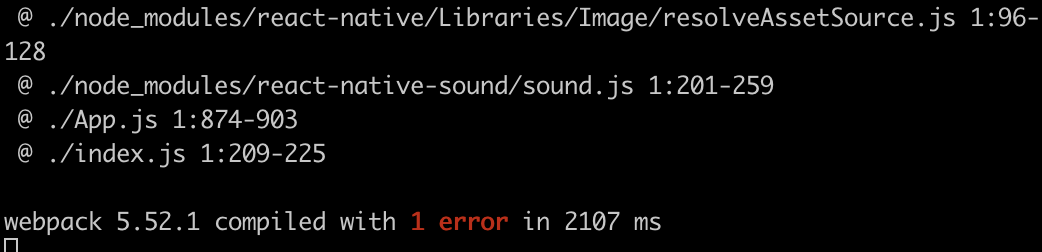
找到每个报错末尾出模块来源,分析依赖关系,比如上图react-native-sound库存在报错。
在web文件夹下创建一个polyfills文件夹,再在其中创建Sound.js文件,方便对这类文件进行管理。
export default {}
然后在webpack配置中添加alias配置:
module.exports = {
mode: 'development',
entry: resolvePath('../index.js'),
module: {
},
resolve: {
alias: {
'react-native{{ content }}#x27;: 'react-native-web',
'react-native-sound': resolvePath('polyfills/Sound.js')
},
},
};
也就是将react-native-sound组件先用一个空壳代替,让项目先运行起来,之后再去实现可用于网页端的特定代码。
生产环境优化
实际情况下,我们需要将项目打包为静态文件,也需要对项目文件进行必要的压缩和处理。
添加build:web命令打包项目为静态文件
{
  "scripts": {
    "start:web": "webpack serve --config web/webpack.config.js",
    "build:web": "webpack --env production --config web/webpack.config.js"
  }
}
配置webpack生产做一些优化
const TerserPlugin = require('terser-webpack-plugin');
const CssMinimizerPlugin = require('css-minimizer-webpack-plugin');
module.exports = (env) => {
const isProduction = !!env.production;
return {
mode: isProduction ? 'production' : 'development',
entry: resolvePath('../index.js'),
devtool: isProduction ? false : 'cheap-module-source-map',
optimization: {
minimize: isProduction,
minimizer: [
new CssMinimizerPlugin(),
new TerserPlugin({
extractComments: 'all',
terserOptions: {
compress: {
drop_console: true,
},
},
}),
],
},
}
}
代码分割、拆包(可选)
有时项目太大会导致打包生产的bundle文件较大,我们可以通过代码分割进行一个拆包。详细配置可见Code Splitting。
return {
optimization: {
minimizer: [
],
splitChunks: {
chunks: 'all',
cacheGroups: {
default: {
name: 'common',
minChunks: 2,
priority: -10,
},
vendors: {
test: /[\\/]node_modules[\\/]/,
name: 'vendor',
priority: -9,
},
checkbox_module: {
minSize: 0,
test: /[\\/]node_modules[\\/]react-native-check-box[\\/]/,
name: 'checkbox_module',
priority: -8,
},
},
},
runtimeChunk: {
name: (entrypoint) => `runtime-${entrypoint.name}`,
},
},
}
补充
可参考案例项目react-native-web-example,实际情况下,我们需要添加网页端支持的项目都较为复杂,大概率会出现一些小问题,就需要我们耐心的一个一个解决。我自己在使用中遇到的很多问题汇总在React Native Web 常见问题解决方案大家可以参考。
版权声明:
Cody's Blog文章皆为站长Cody原创内容,转载请注明出处。
包括商业转载在内,注明下方要求的文章出处信息即可,无需联系站长授权。
请尊重他人劳动成果,用爱发电十分不易,谢谢!
请注明出处:
本文出自:Cody's Blog
本文永久链接:https://okcody.com/posts/frontend/20